General Tips & Information
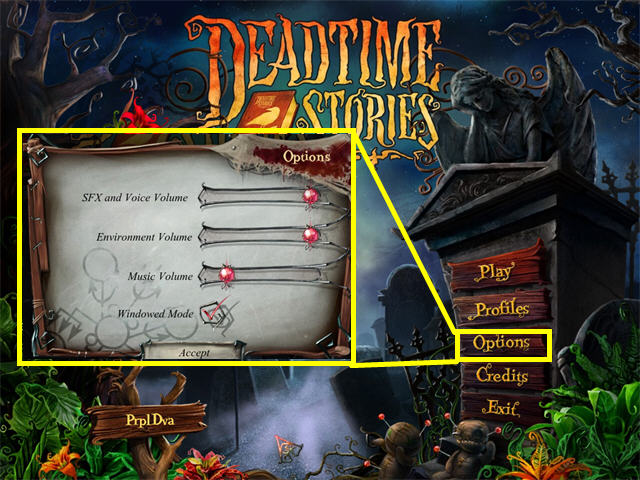
- From the main screen you may manage player profiles.
- The options menu allows for the adjustment of music and sounds volume.
- You may play this game in windowed or full screen mode.
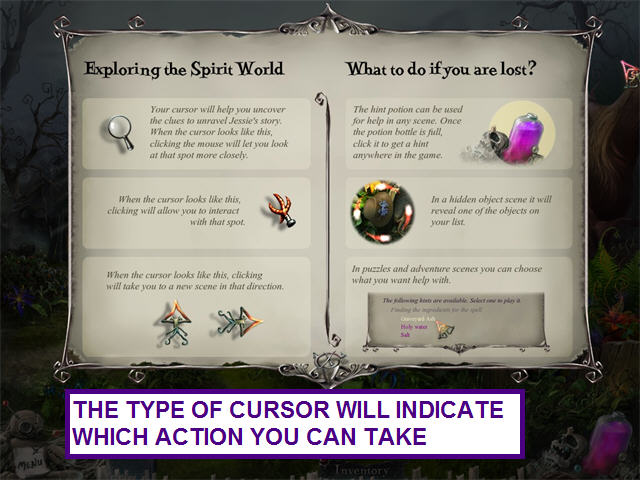
- The type of cursor will indicate the type of action you may take.
- A magnifying glass indicates that a closer look is necessary.
- The claw cursor means that you can take an item or use an inventory item on it.
- When the cursor changes from a triangle shape to an arrow with tails, you can move in that direction.
- Should you get stuck, click on the pink potion bottle in the lower right corner.
- During hidden object scenes, it will highlight one item from the list.
- You can chose the task or puzzle that you need help with in the adventure or puzzle screens.
- Hints are unlimited, but you must wait for the bottle to refill.
- You may skip mini-games.
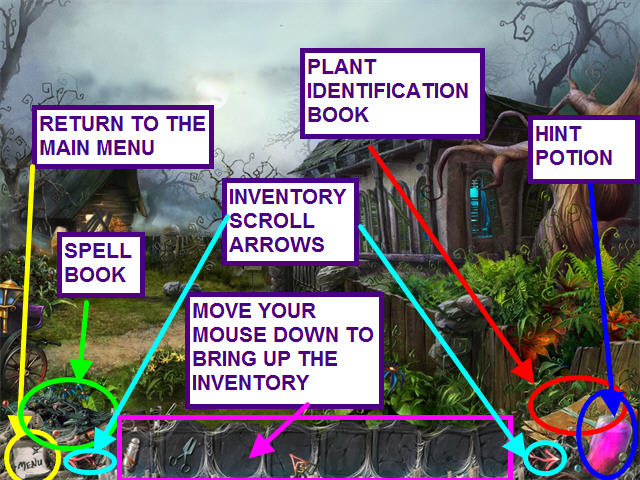
- The lower right corner has the pink hint potion bottle.
- Click on the bottle for a hint.
- Just above the hint bottle is the plant identification book.
- Refer to this book when you don't know what a plant looks like for your potion.
- The bottom center area is your inventory.
- Move your cursor to the bottom to raise the items.
- There are left and right arrows to allow scrolling through your items.
- Just above the menu button in the lower left is the spell book.
- When you find recipes, they will automatically fill the pages.
- Pages that have splotches and are unreadable will be found later in the game.
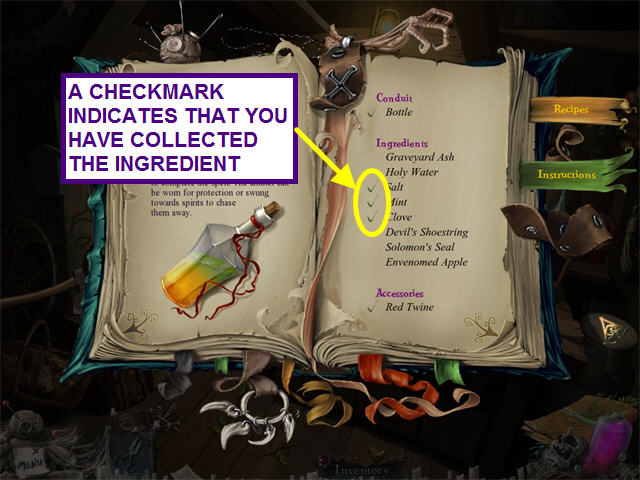
- The green check mark next to an ingredient indicates that you have collected the item.
- Use the arrows to turn the page.
Chapter One – Outside Jesse's Home
- Spirits are blocking the entrance to Jesse's home.
- She urges you to find her spell-book and the spell to banish the spirits.
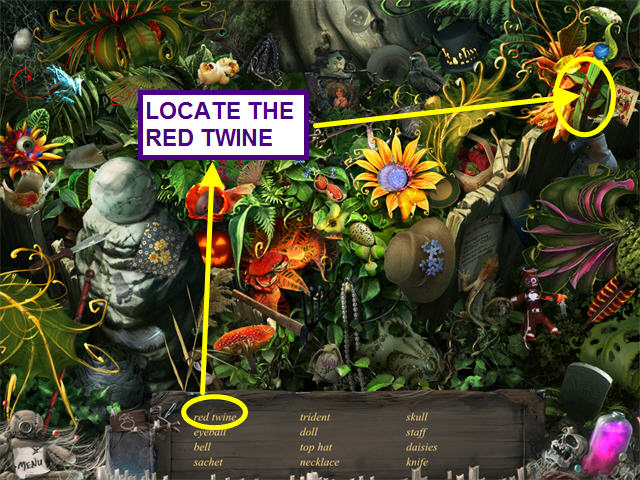
- Once you arrive at Jesse's home, click on the the sparkling area on the far right for a hidden object area.
- Locate all the items on the hidden object list.
- Collect the inventory item – RED TWINE.
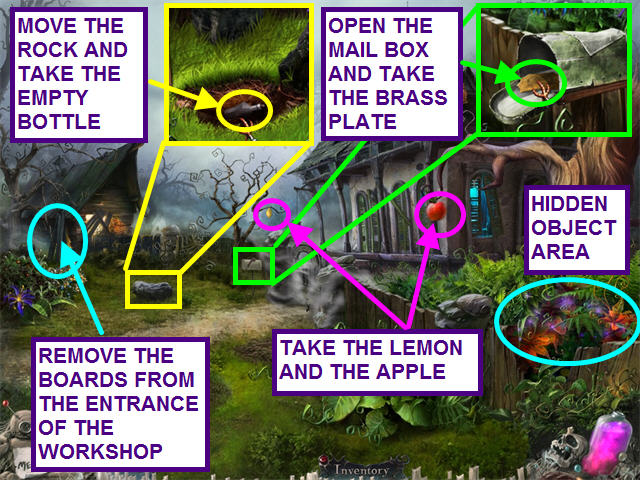
- Take the APPLE and the LEMON from the two trees.
- Look at the close-up of the mail-box and open the door.
- Take the INTRICATELY SHAPED BRASS PLATE.
- Click on the large rock near the path to move it.
- Look at the close-up of the hole underneath and take the EMPTY BOTTLE.
- Move the boards away from the entrance to the workshop.
- Click on the door way to enter the workshop.
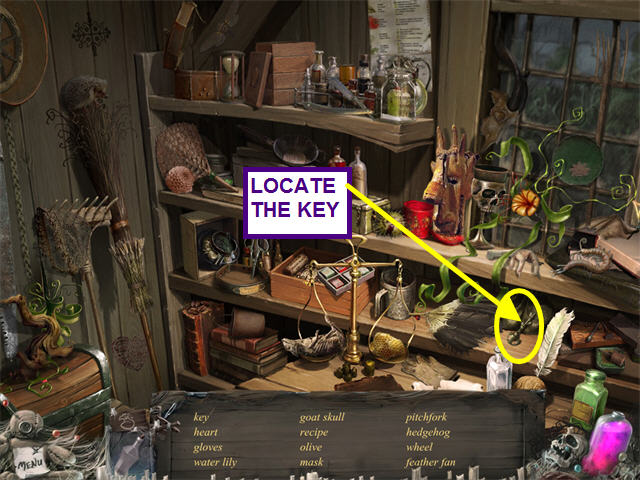
- Inside the workshop, click on the sparkling area on the upper left shelf for a hidden object area.
- Locate all the items on the hidden object list.
- Collect the inventory item – KEY.
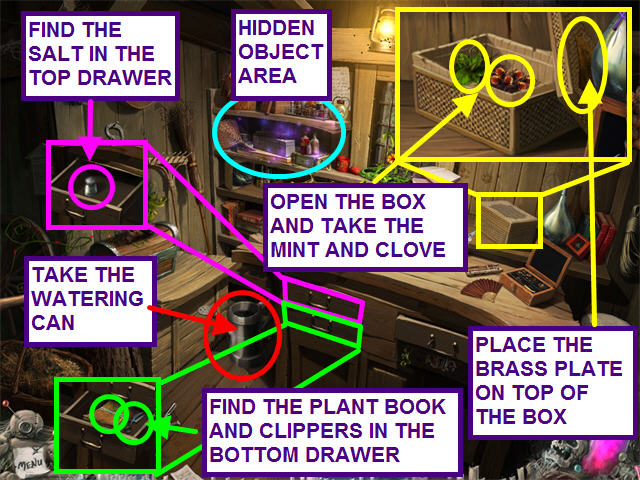
- Take the WATERING CAN.
- Look at the close-up of the woven box and place the INTRICATELY SHAPED BRASS PLATE into the niche on the top.
- Open the box and take the CLOVE and MINT.
- Open the top left drawer of the desk and take the SALT.
- Look in the lower left drawer for the book on plants.
- The book will now appear next to the hint bottle.
- From the same drawer, take the CLIPPERS.

- Look at the close-up of the yellow flower in the window.
- Click on the snake several times until his mouth is open.
- Use the APPLE on the snake to make the ENVENOMED APPLE.
- Notice the sparkling area on the desk.
- Look in the upper right drawer and notice the words “Open Me†appear to be burned in from below.
- Use the KEY to unlock the bottom right drawer.
- Open the drawer and click on the Spirit board to trigger a mini-game.

- Click on the letters to spell out “OPEN MEâ€.
- Take the spell book that was hidden underneath the spirit board.
- The spell book will now be found on the lower left of the screen.
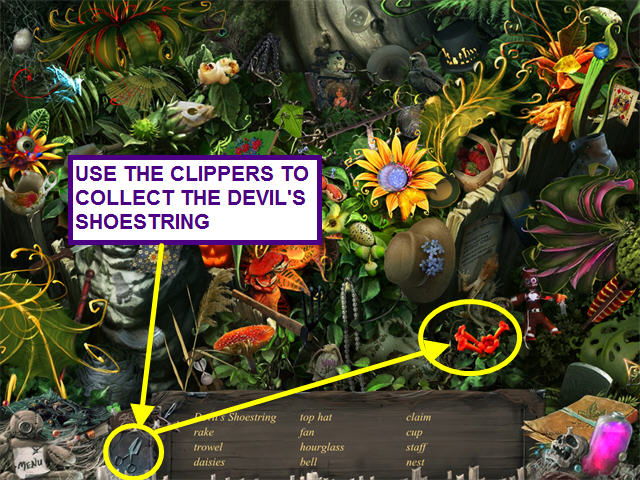
- Exit the workshop and select the sparkling area in the lower right for a hidden object scene.
- Locate all the items on the hidden object list.
- Use the CLIPPERS to collect the inventory item – DEVIL'S SHOESTRING.
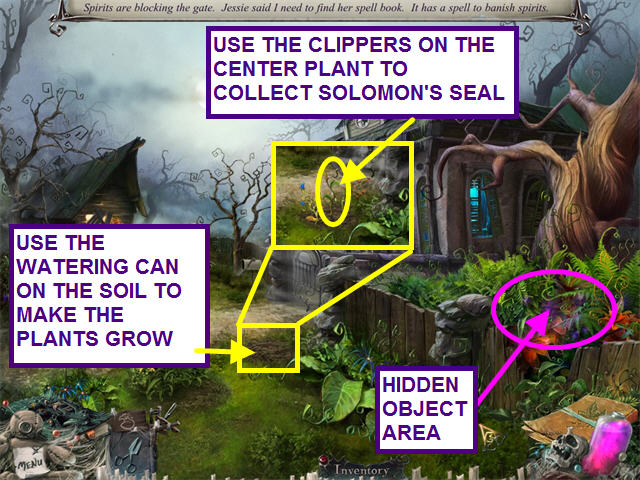
- Use the WATERING CAN on the patch of dirt to make the plants grow.
- Use the CLIPPERS on the center plant to collect the Solomon's Seal.
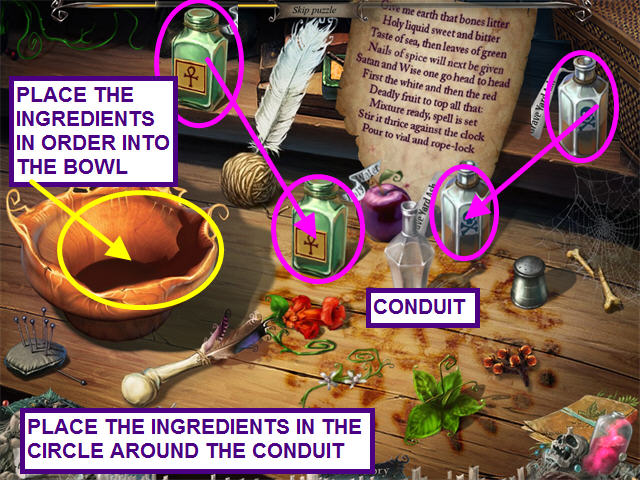
- Enter the workshop and click on the sparkling area on the desk.
- Look in the spell book and click on the instructions tab.
- You need to place the 'conduit' in the center of the 'veve' or circle and the ingredients around the outside.
- Once all the ingredients are in place, the loa will provide instructions on how to complete the spell.
- Place the EMPTY BOTTLE in the center of the circle.
- Put the DEVIL'S SHOESTRING, SOLOMON'S SEAL, ENVENOMED APPLE, SALT, CLOVE and MINT around the outer edge of the circle.
- The remaining two ingredients are found on the shelf in this scene.
- Take the HOLY WATER and GRAVEYARD ASH and add them to the circle.
- When all the ingredients are in place, instructions will appear on how to prepare the potion.
- Place the items in the left bowl in this order: GRAVEYARD ASH, HOLY WATER, SALT, MINT, CLOVE, SOLOMON'S SEAL, DEVIL'S SHOESTRING, and the ENVENOMED APPLE.
- Click, hold and drag the stirrer counter-clockwise three times.
- Pout the mixture into the EMPTY BOTTLE and tie the RED TWINE on the bottle to create the BANISH SPIRITS AMULET.
- Exit the workshop and use the BANISH SPIRITS AMULET on the blocked gate.
Chapter Two – Inside Jesse's Home
- All the spiritual residue on the window is blocking the light and preventing the spirits in the mirror from departing.
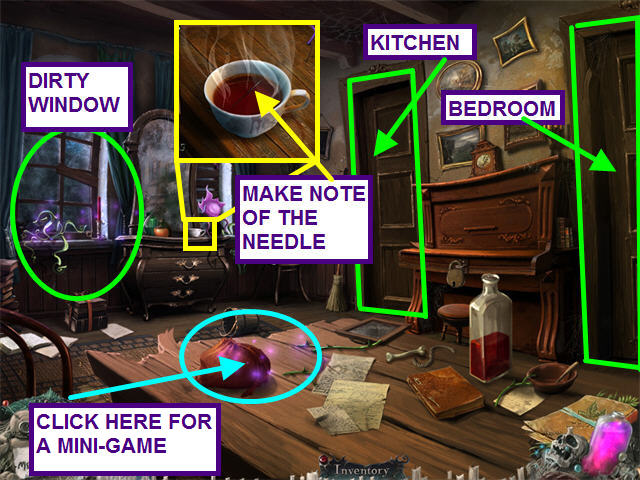
- Look at the sparkling area by the windows to see that no light is coming in.
- Look at the close-up of the tea cup in front of the mirror.
- Make note of the needle in the scalding tea for later.
- The door on the right leads to the bedroom and the left door opens to the kitchen.
- Click on the sparkling bag on the table for a mini-game.
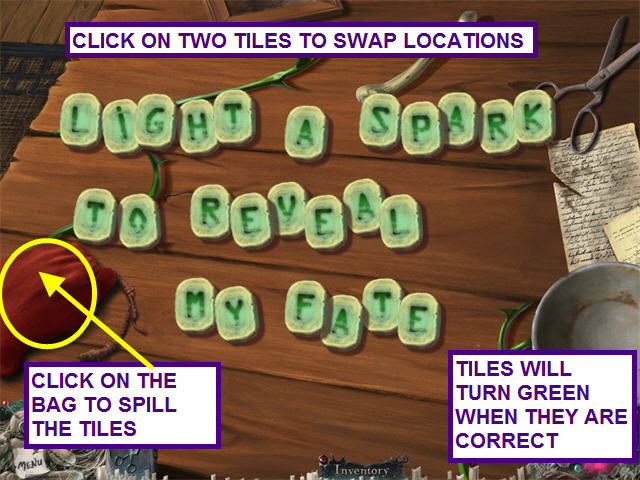
- Click on the bag in the lower left corner to spill the tiles onto the table.
- The object of this mini-game is to swap the tiles and discover the message.
- Click on two tiles to swap locations.
- When a tile is correctly placed, it will turn green.
- Arrange the tiles to spell out: LIGHT A SPARK TO REVEAL MY FATE.
- Exit the table and enter the right door.
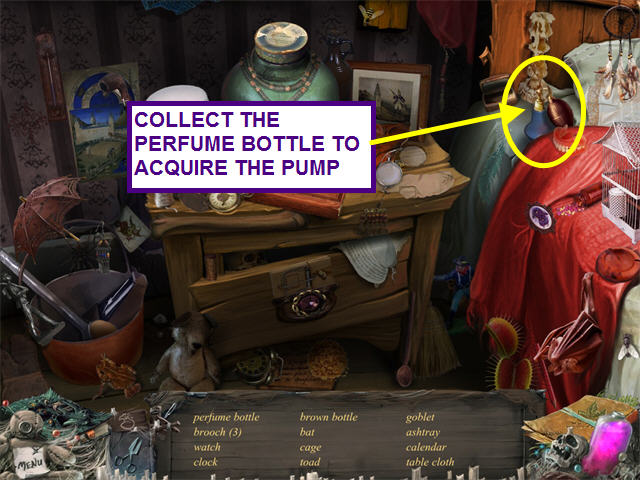
- Click on the the sparkling area on the night stand for a hidden object area.
- Locate all the items on the hidden object list.
- Collect the inventory item – the PUMP from the perfume bottle.
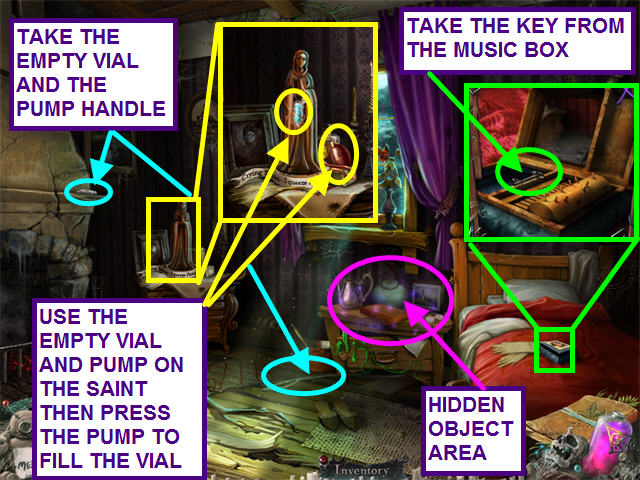
- Take the PUMP HANDLE from the floor and the EMPTY VIAL from the mantle.
- Look at the close-up of the music box on the bed.
- Open the music box and take the PIANO KEY.
- Look at the close-up of the saint on the table.
- Use the EMPTY VIAL and the PUMP on the saint.
- Click on the pump until the vial is filled with blue tears.
- Take the TEARS OF A SAINT.
- Exit the bedroom.
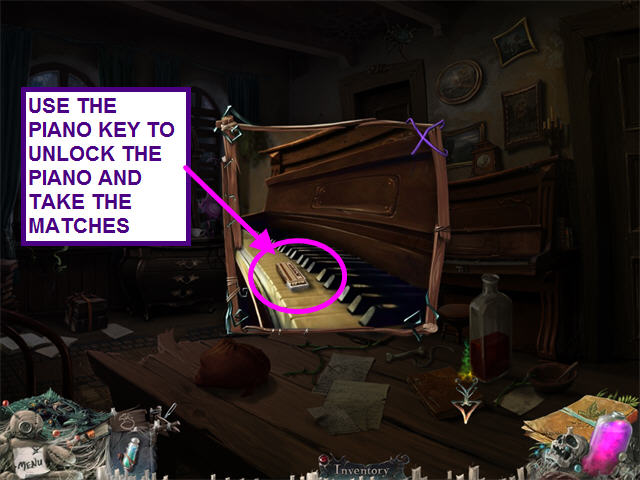
- Use the PIANO KEY to unlock the piano.
- Open the piano and take the MATCHES to trigger a mini-game.
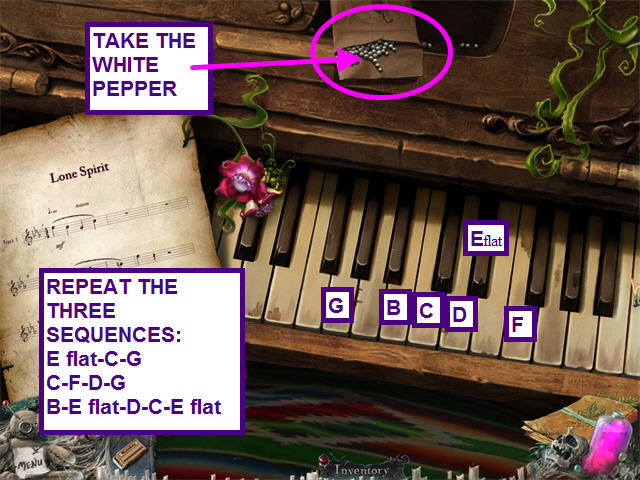
- The object of this mini-game is to repeat the three sequences played on the piano.
- The three sequences are: E flat-C–G; C-F-D-G; B-E flat-D-C-E flat.
- Take the WHITE PEPPER.
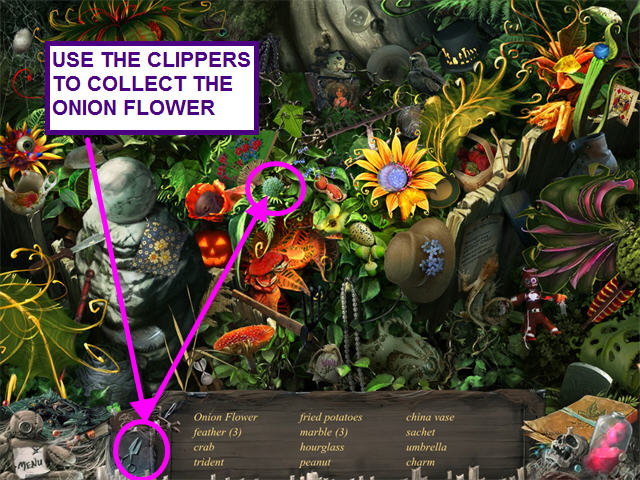
- Exit the house and click on the sparkling are on the right for a hidden object game.
- Locate all the items on the hidden object list.
- Use the CLIPPERS to collect the inventory item – ONION FLOWER
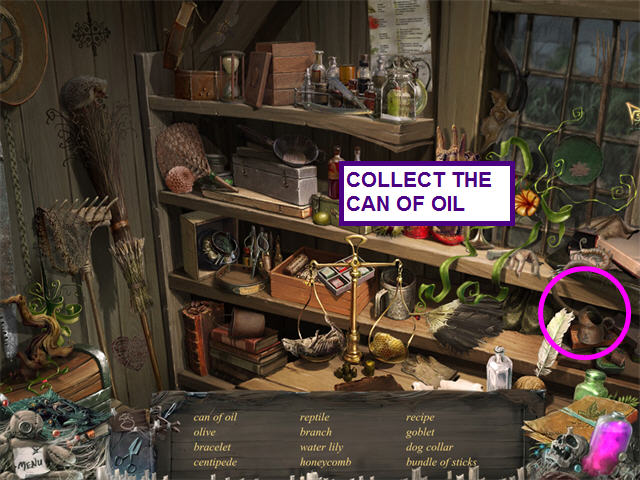
- Enter the workshop and select the sparkling area on the shelf for a hidden object area.
- Locate all the items on the hidden object list.
- Collect the inventory item – CAN OF OIL.
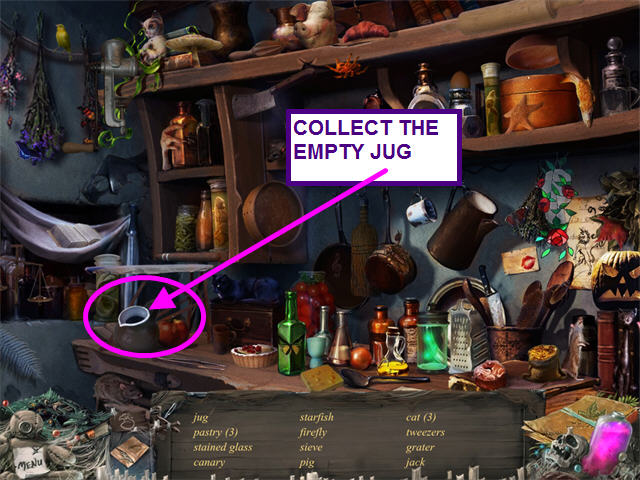
- Return to the house and enter the kitchen.
- Select the sparkling area on the shelves for a hidden object screen.
- Locate all the items on the hidden object list.
- Collect the inventory item – EMPTY JUG
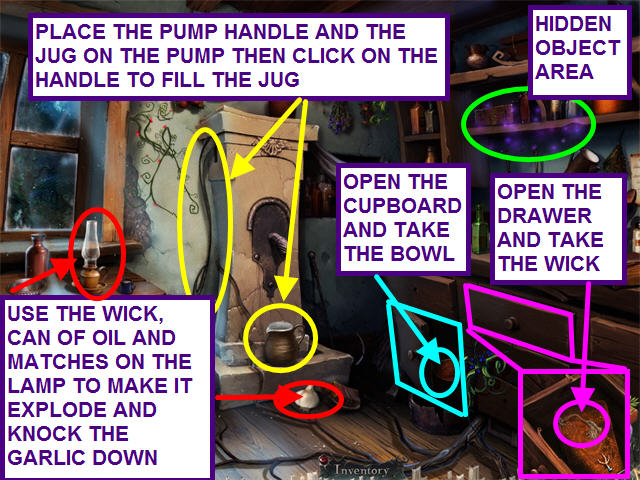
- Open the lower left cupboard to find the WOODEN BOWL.
- Open the drawer and take the WICK.
- Place the PUMP HANDLE on the left side of the pump.
- Place the JUG under the spigot.
- Click on the handle to fill the jug and get the JUG OF WATER.
- Use the WICK and the CAN OF OIL on the lamp.
- Use the MATCHES on the LAMP to cause an explosion and knock some GARLIC down to the floor.
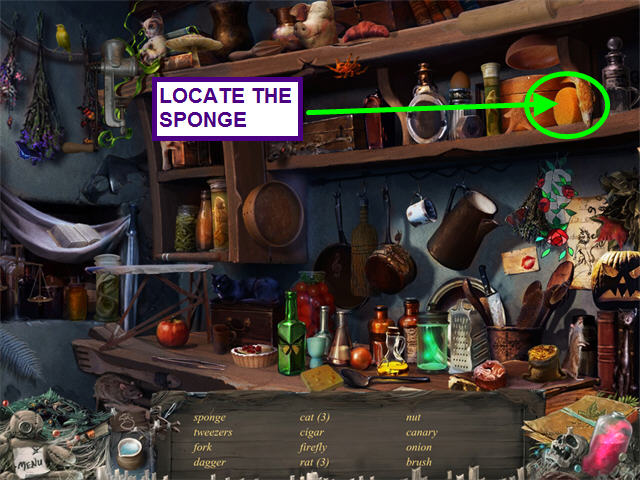
- Click on the sparkling area for another hidden object hunt.
- Locate all the items on the hidden object list.
- Collect the inventory item – SPONGE.
- Exit the kitchen and return to the workshop.
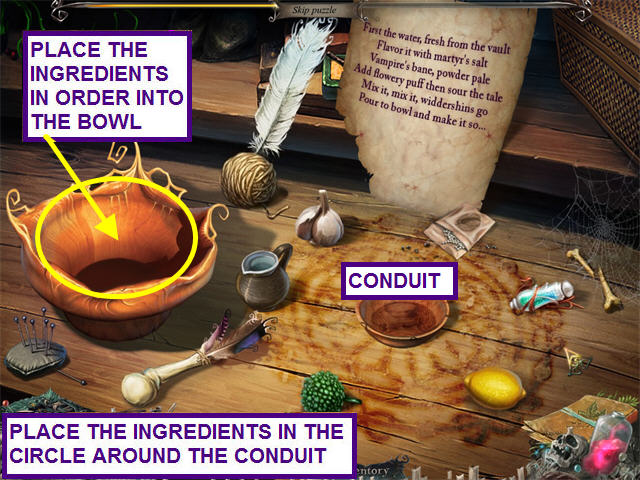
- Click on the sparkling area on the desk.
- Place the WOODEN BOWL in the center as the conduit.
- Place the ONION FLOWER, TEARS OF A SAINT, GARLIC, LEMON, WHITE PEPPER, and JUG OF WATER in the circle around the conduit.
- After the instructions appear, place the items in the mixing bowl on the left in the following order: JUG OF WATER, TEARS OF A SAINT, GARLIC, WHITE PEPPER, ONION FLOWER, and LEMON.
- Click, hold and drag the stirrer counter-clockwise twice.
- Pour the mixture in the the WOODEN BOWL, then take the GREASE CLEANING MIXTURE.
- Exit the workshop and return to the house.
- Click on the sparkling area near the window.
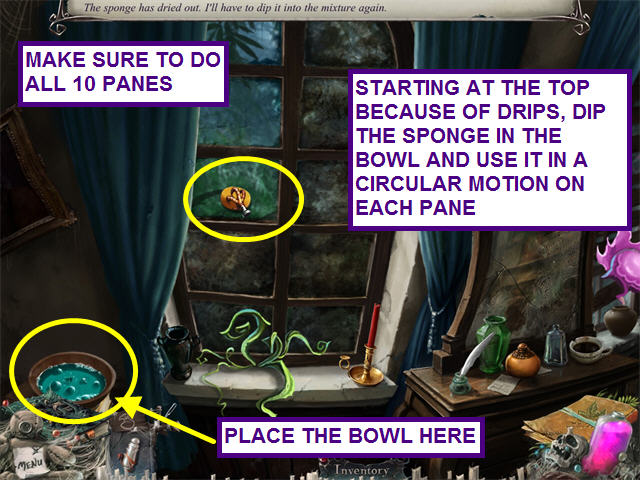
- Place the GREASE CLEANING MIXTURE on the swirling area on the lower left.
- Take the SPONGE from your inventory and dip it in the mixture.
- Starting at the top pane, click, hold and drag the sponge in a circular motion.
- If you don't start at the top, clean panes will get dirty again from drips.
- You will need to dip the sponge for each of the 10 panes.
- Click on the mirror to see that the spirits are gone.
Chapter Three – LaLaurie's Place
- Mrs. LaLaurie has sent a servant to fetch Miss. Bodeen.
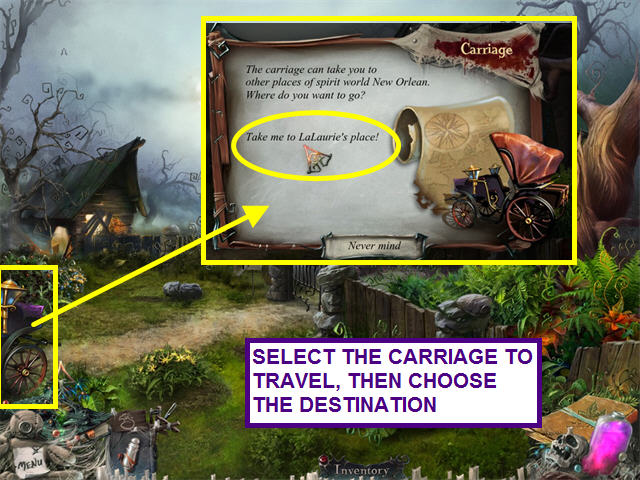
- You now have the use of a carriage.
- Click on the carriage to travel and select your destination.
- Select “Take me to LaLaurie's Place.â€
- Jessie tells you of 8 spirits trapped here and ads the Reveal Spirits spell to the spell book.
- If you need to return to Jesse's home, click on the carriage.
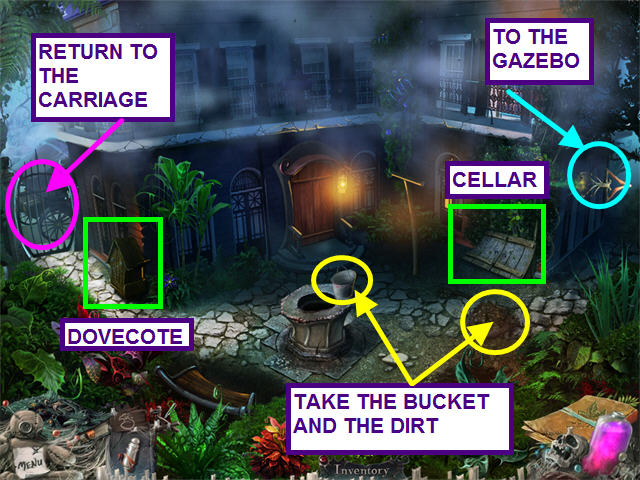
- Take the BUCKET and the DIRT.
- Make note of the dovecote and the cellar door.
- Move your cursor to the right edge of the screen and click when the arrow appears to travel to the gazebo.
- Travel north from the gazebo to the river.
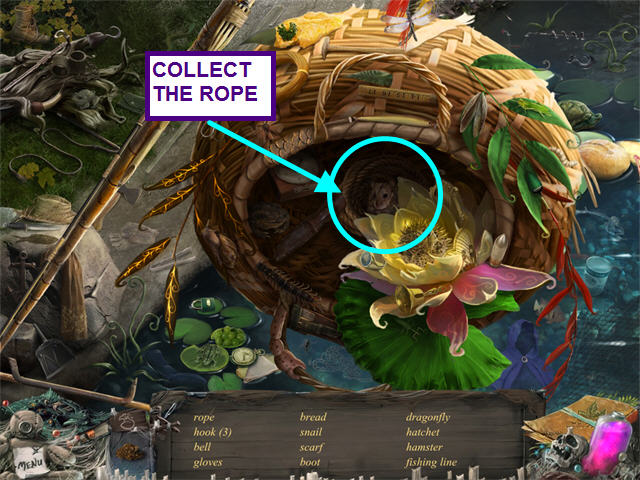
- Click on the sparkling area for a hidden object screen.
- Locate all the items on the hidden object list.
- Collect the inventory item – ROPE.

- Use the BUCKET on the oven th collect the ash and get the ASHES BUCKET.
- Look at the closeup of the tree.
- Use the vial on the tears to collect the VIAL OF BLOOD.
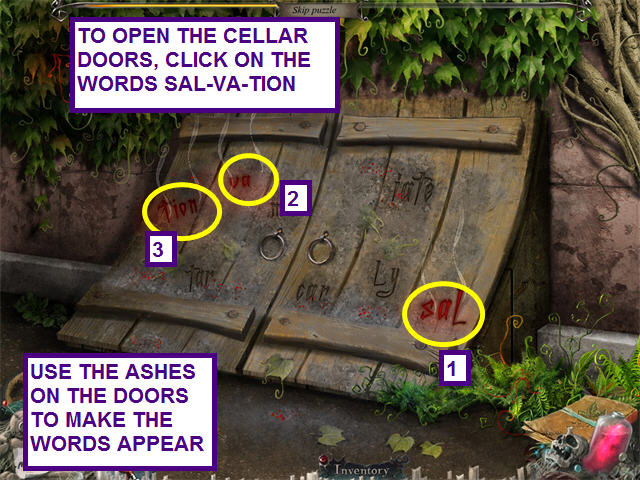
- Return to the back of the house and look at the close-up of the cellar door for a mini-game.
- Use the ASHES BUCKET on the doors to make the letters written in water appear.
- Click on SAL-VA-TION to open the cellar doors.
- Inside the cellar is another mini-game.
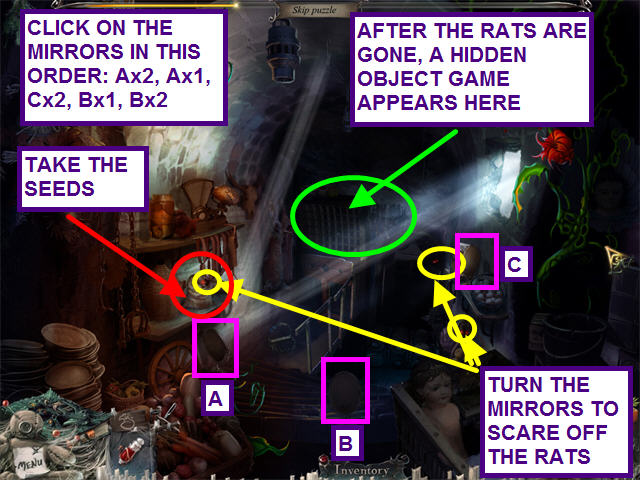
- The object of this mini-game is to turn the mirrors to scare away the rats.
- Click on mirror A twice- you should hear a squeal.
- Click on mirror A once, mirror C twice, and mirror B once.
- You will hear a second squeak.
- To scare the last rat, click on mirror B trice.
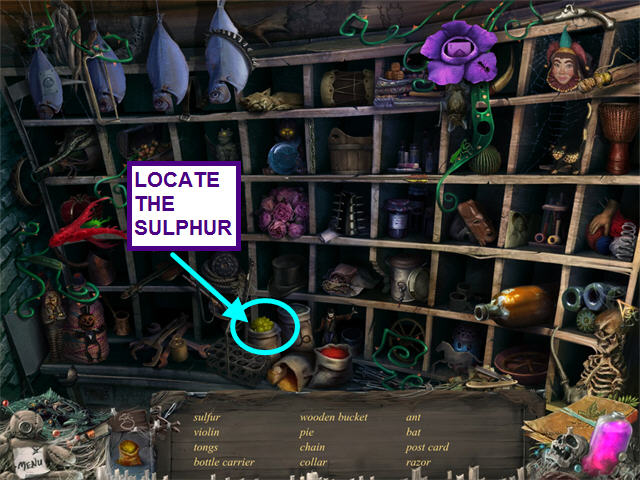
- Click on the sparkling area for a hidden object screen.
- Locate all the items on the hidden object list.
- Collect the inventory item – SULFUR.
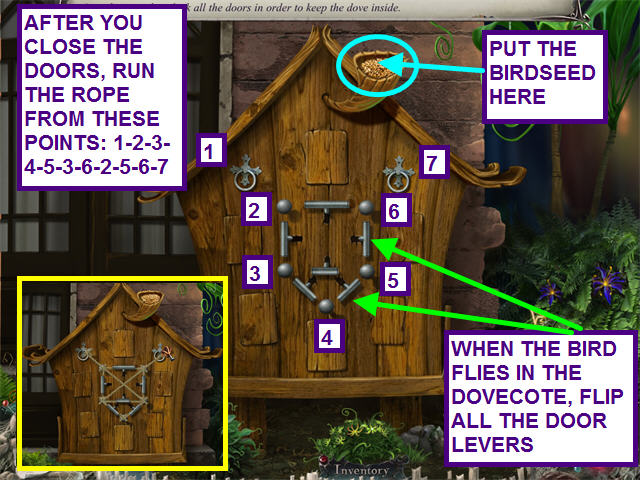
- Look at the close-up of the dove cote.
- Pour the SEEDS into the funnel at the top of the dovecote.
- Flip all the levers to close all the doors.
- Number the tie-off points from 1-7, going left to right.
- Take the rope from you inventory and use it on points: 1-2-3-4-5-3-6-2-5-6-7.
- The FEATHER will go automatically into your inventory.

- Return to the river and select the sparkling hidden object scene.
- Locate all the items on the hidden object list.
- Collect the inventory item – METAL CUTTERS.
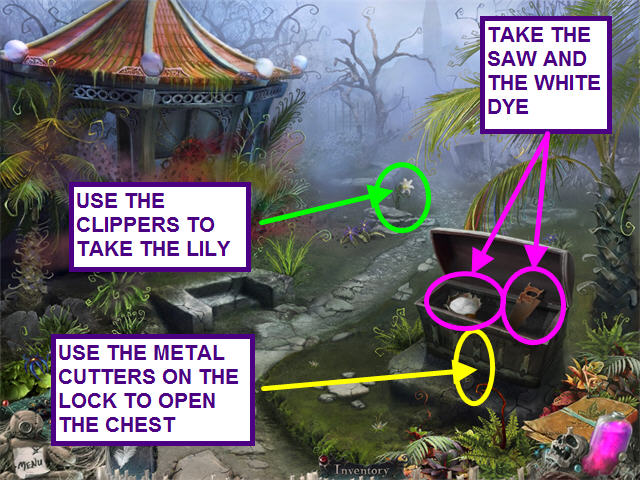
- Walk south to the gazebo area.
- Use the CLIPPERS to take the LILY.
- Use the METAL CUTTERS on the lock of the chest.
- Take the SAW and the WHITE DYE.
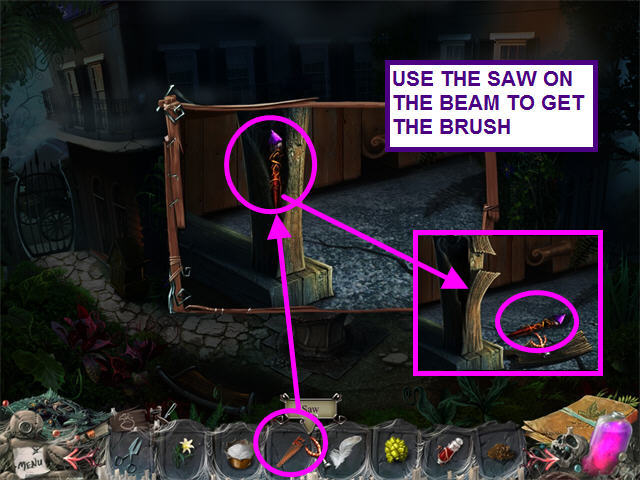
- Return to the back of the house and look at the close-up of the beam on the porch.
- Use the SAW on the beam to take the BRUSH.
- Click on the carriage, then click on the phrase, “Take me to Jessie's home.â€
- Enter the workshop and click on the sparkling desktop.
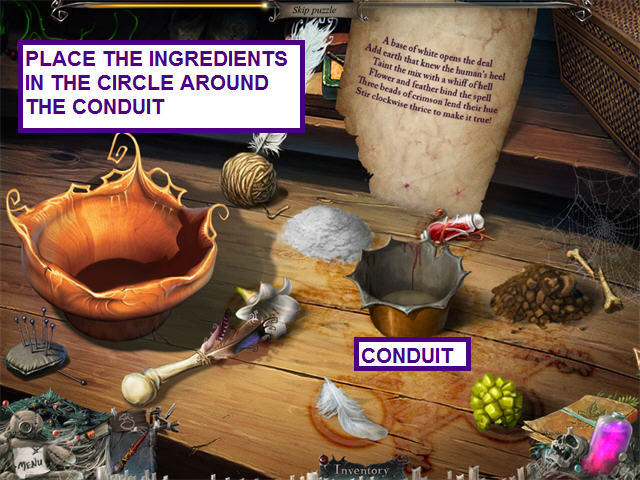
- Place the WHITE DYE, LILY, FEATHER, SULFUR, DIRT, AND 3 DROPS OF BLOOD IN THE CIRCLE.
- After you place the WHITE DYE in the circle, the can is returned to your inventory.
- Place the CAN in the center of the circle.
- After the instructions appear, place the items in the bowl in the following order: WHITE DYE, DIRT, SULFUR, LILY, FEATHER, and 3 DROPS OF BLOOD.
- Click, hold and drag the stirrer clockwise three times.
- Pour the mixture into the can and take the SPIRITS REVEALING MIXTURE.
- Exit the workshop and take the carriage back to LaLaurie's place.
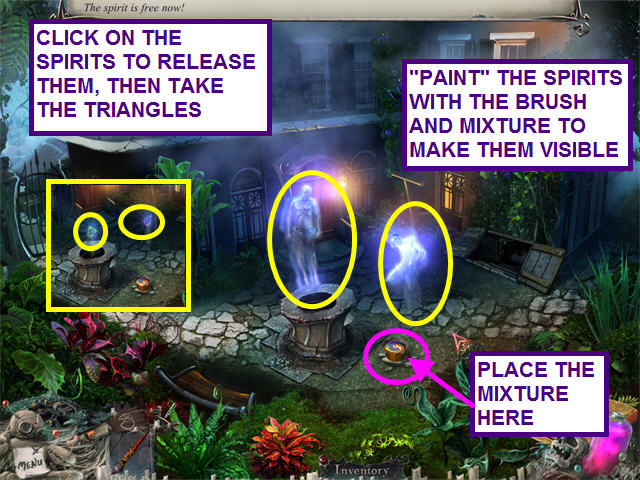
- Place the SPIRITS REVEALING MIXTURE on the stone with the swirls.
- Take the BRUSH from your inventory and use it on the SPIRITS REVEALING MIXTURE.
- Note- click on the bowl with the cursor, not where the tip of the brush hits the bowl.
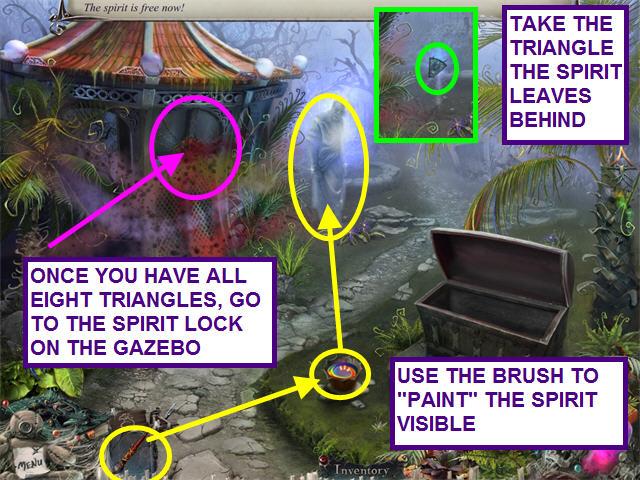
- A pop-up tells you that there are 2 spirits here.
- If you wave the brush over the scene you will see a flash of the spirit and hear a moan.
- Wave the brush over the spirits with the BRUSH until each is visible.
- There is one spirit by the whipping post and the other is standing on the well.
- Once the BRUSH goes back into Your inventory, click on each spirit to release them and find each of their TRIANGLES for the spirit lock.
- Take the SPIRITS REVEALING MIXTURE and enter the cellar.
- Place the SPIRITS REVEALING MIXTURE on the pile of plates with the swirls.
- Take the BRUSH from your inventory and use it on the SPIRITS REVEALING MIXTURE.
- Note- click on the bowl with the cursor, not where the tip of the brush hits the bowl.
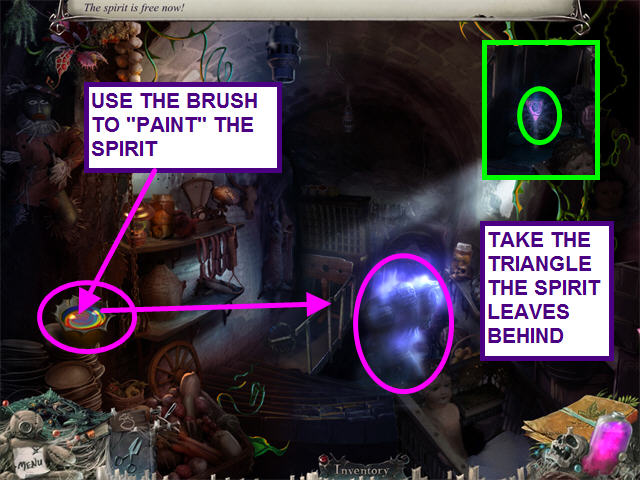
- A pop-up tells you that there is 1 spirit here.
- If you wave the brush over the scene you will see a flash of the spirit and hear a moan.
- Wave the brush over the spirit with the BRUSH until it is visible.
- The spirit is at the bottom of the stairs.
- Once the BRUSH goes back into your inventory, click on the spirit to release it and find its TRIANGLE for the spirit lock.
- Take the SPIRITS REVEALING MIXTURE and enter the cellar.

- Place the SPIRITS REVEALING MIXTURE on the stone with the swirls.
- Take the BRUSH from your inventory and use it on the SPIRITS REVEALING MIXTURE.
- Note- click on the bowl with the cursor, not where the tip of the brush hits the bowl.
- A pop-up tells you that there are 4 spirits here.
- If you wave the brush over the scene you will see a flash of the spirit and hear a moan.
- Wave the brush over the spirits with the BRUSH until each is visible.
- The spirits are located on the right and left side of the crying tree trunk, hanging in the noose and the fourth is by the fishing gear.
- Once the BRUSH goes back into your inventory, click on each spirit to release them and find each of their TRIANGLES for the spirit lock.
- Take the SPIRITS REVEALING MIXTURE and go to the gazebo.
- Place the SPIRITS REVEALING MIXTURE on the stone with the swirls.
- Take the BRUSH from your inventory and use it on the SPIRITS REVEALING MIXTURE.
- Note- click on the bowl with the cursor, not where the tip of the brush hits the bowl.
- A pop-up tells you that there is 1 spirit here.
- If you wave the brush over the scene you will see a flash of the spirit and hear a moan.
- Wave the brush over the spirit with the BRUSH until it is visible.
- The spirit is at just on the right of the gazebo.
- Once the BRUSH goes back into your inventory, click on the spirit to release it and find its TRIANGLE for the spirit lock.
- Take the SPIRITS REVEALING MIXTURE and enter the cellar.
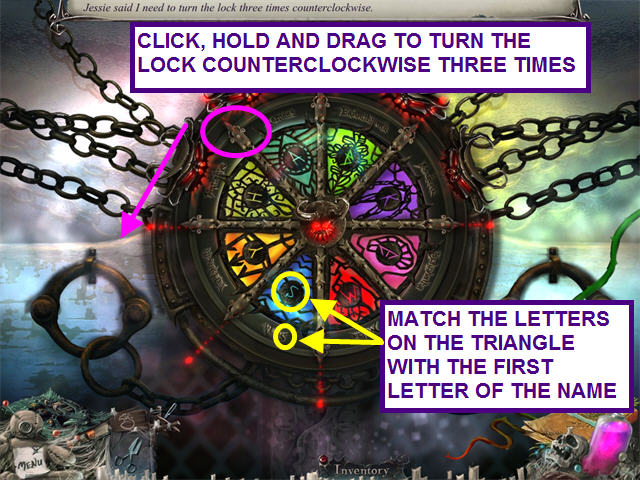
- Now that you have all eight TRIANGLES from the spirits, click on the gazebo to see the spirit lock.
- Place the eight TRIANGLES into the lock.
- The letter on each TRIANGLE corresponds to the first letter of a name on the lock.
- Once the triangles are in place, click, hold and drag the lock counter-clockwise three times.
- Delphine LaLaurie wants Jessie to make sure that Mrs. Anton is unable to attend any functions in the season.
Chapter Four – The Cajun Swamp
- Take the carriage and head to the Cajun swamp.
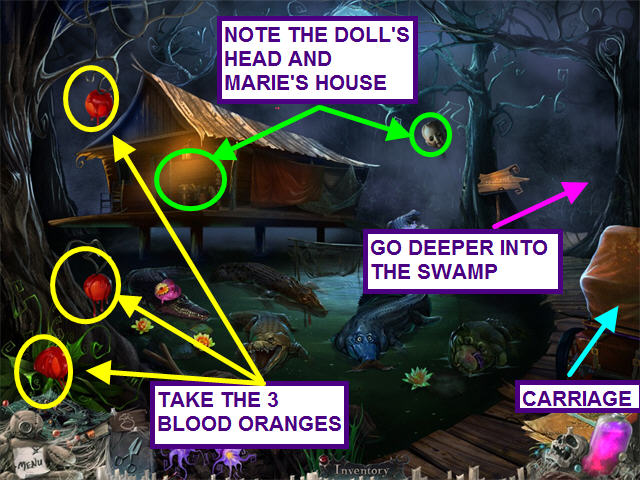
- Mambo Marie want you to find her blue anole, but you need to appease the gators first.
- Take the three blood oranges.
- Note the location of Marie's house.
- Take note of the doll's head.
- Look at each of the gators and note any unusual attributes.
- Head right to go deeper into the swamp.
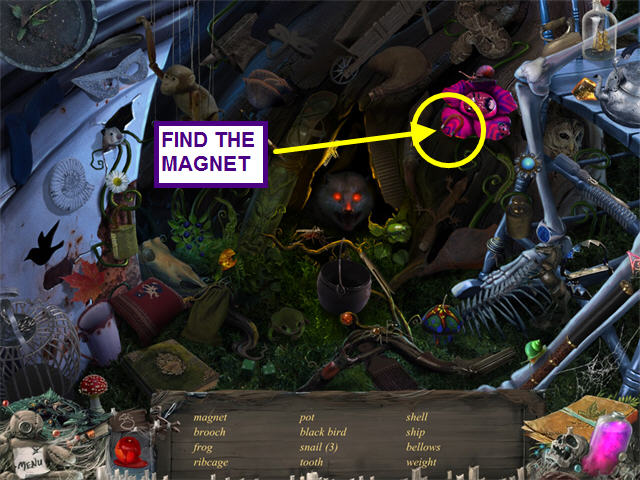
- Click on the sparkling hidden object area.
- Locate all the items on the hidden object list.
- Collect the inventory item – MAGNET.
- Look at the close-up of the washtub.
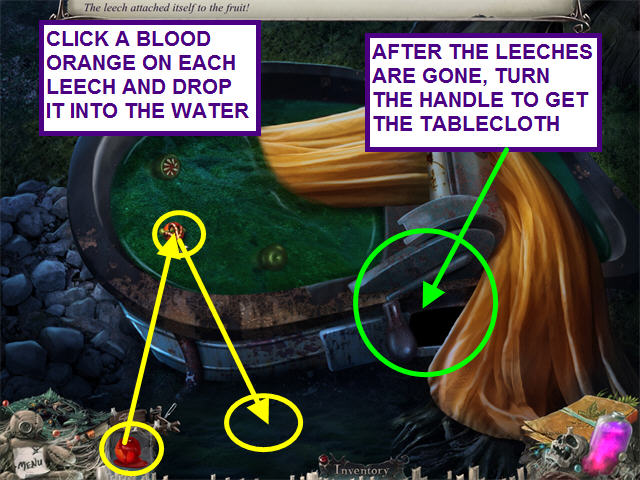
- Take a BLOOD ORANGE from your inventory and click on a leech when it surfaces.
- Throw the leech and orange into the water.
- Repeat this for the other two leeches.
- Click on the washtub's handle to retrieve the TABLECLOTH.
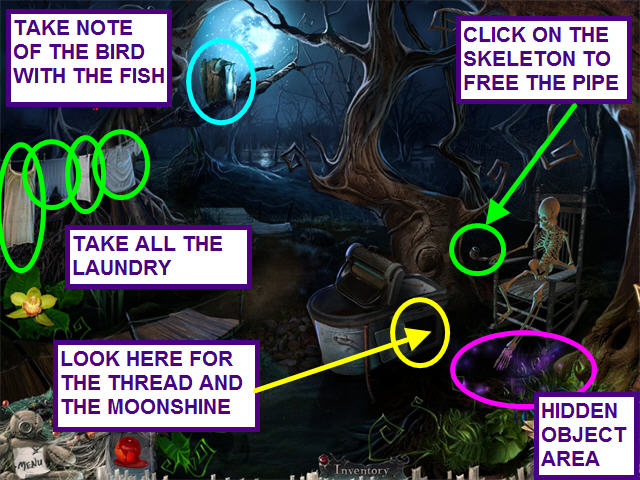
- Take the four items hanging on the laundry line.
- Click on the skeleton and he will release the PIPE.
- Take the PIPE.
- Look inside the panel on the side of the washtub.
- Take the THREAD and the BOTTLE OF MOONSHINE.
- Make note of the bird with the fish.
- Return to the carriage and go to Jessie's home.
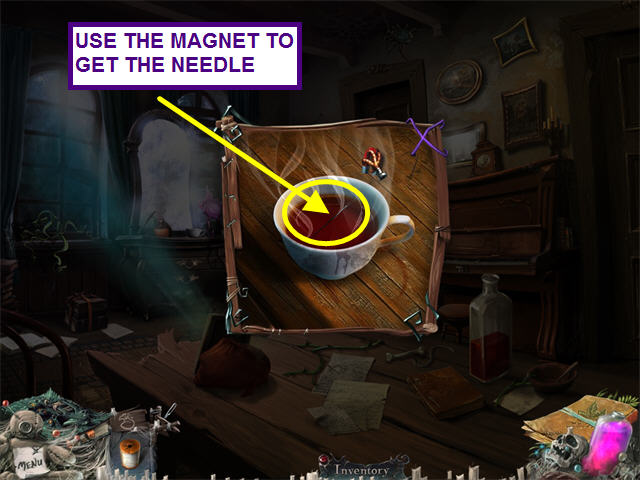
- Enter the house and look at the close-up of the teacup.
- Use the MAGNET to take the needle.
- It will automatically combine with the THREAD to become the SEWING KIT.
- Take the carriage back to the swamp and return to the washtub area.
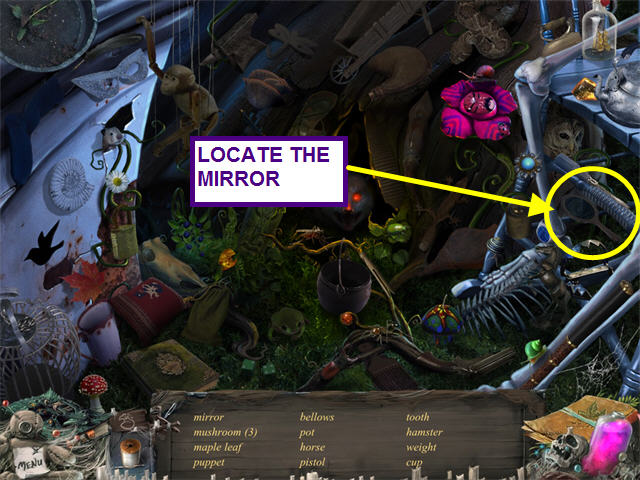
- Click on the sparkling hidden object area.
- Locate all the items on the hidden object list.
- Collect the inventory item – MIRROR.
- Walk up to go deeper into the swamp.
- Look at the close-up of the boat.
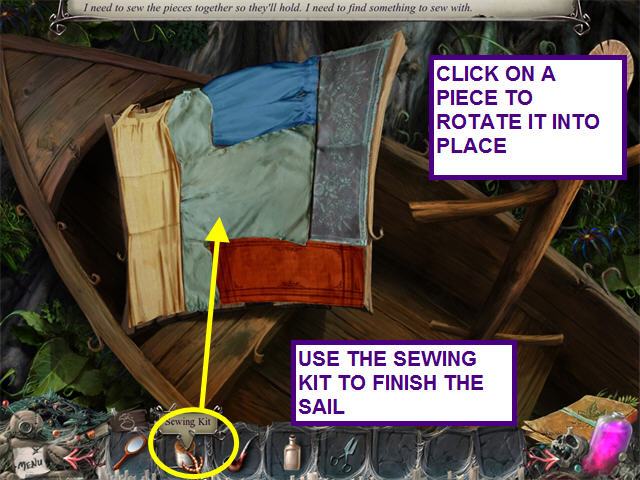
- Place the TABLECLOTH and the other laundry items on the boards to make a sail.
- Use the SEWING KIT to finish the sail.
- Click on the boat to place it in the water.
- Click on the boat again and it will take a trip to the mango tree and bring back a MANGO.
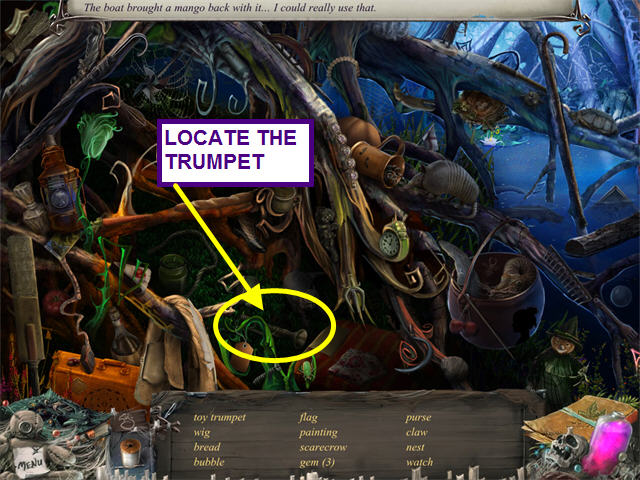
- Click on the sparkling hidden object area where the boat was originally..
- Locate all the items on the hidden object list.
- Collect the inventory item – TRUMPET.
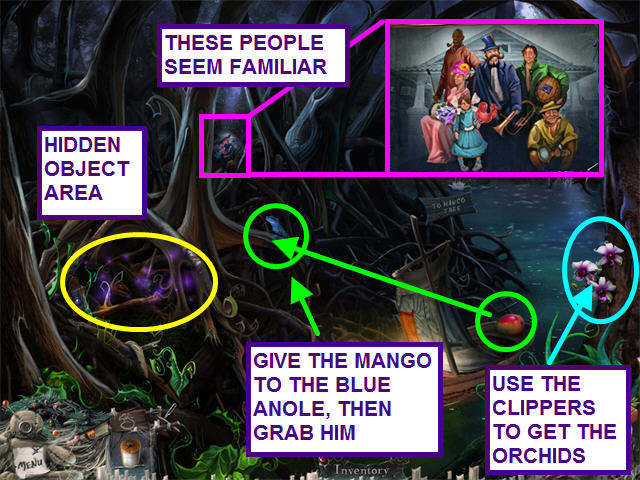
- Take the MANGO and give it to the BLUE ANOLE.
- Take the BLUE ANOLE.
- Use the CLIPPERS to take the ORCHIDS.
- Look at the portrait and notice that the gator have similar attributes.
- Return to the front of the swamp where the gators are waiting.
- Immediately, return to the boat.
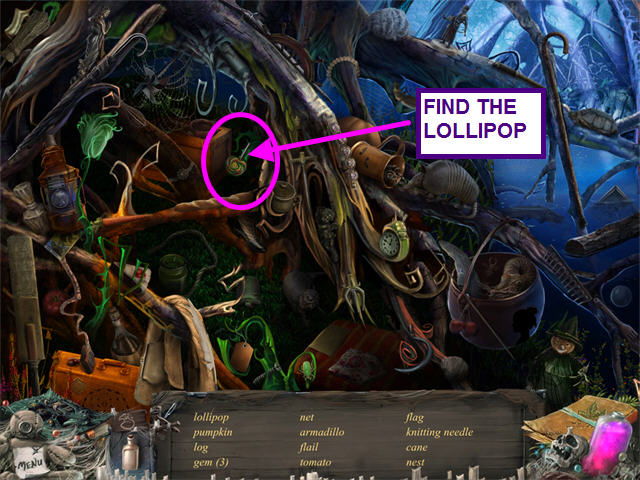
- Click on the sparkling hidden object area where the boat was originally..
- Locate all the items on the hidden object list.
- Collect the inventory item – LOLLIPOP.
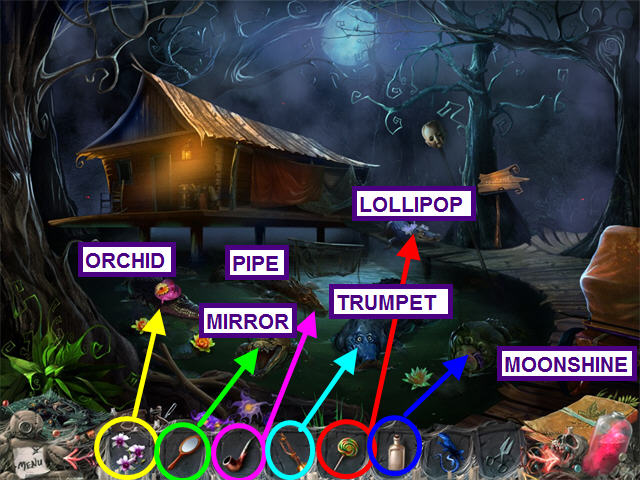
- Give the gator with the flowered hat the ORCHIDS.
- The gator with the cattail wants the PIPE.
- The TRUMPET will make the gator with the mustache happy.
- The toothy gator wants the MIRROR.
- MOONSHINE is what the gator with the red nose is looking for.
- Give the LOLLIPOP to the crying gator.
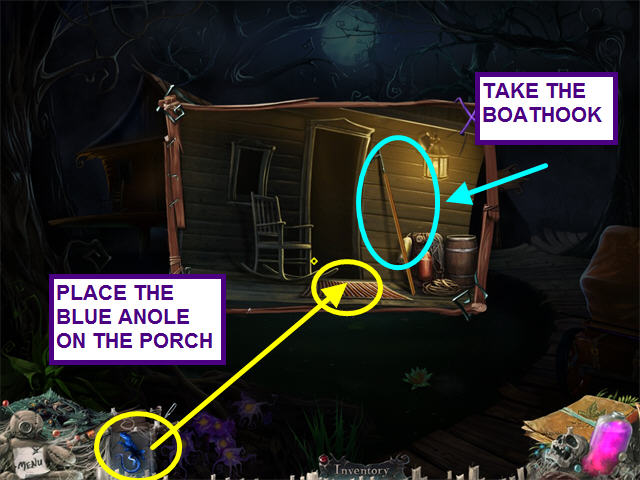
- Now that the path is clear, click on the porch.
- Take the BOAT HOOK.
- Place the BLUE ANOLE on the rug.
- Mambo Marie warns Jessie against cursing Mrs. Anton and suggests a medicine to make her sick instead.
- Exit to the carriage and travel the the French Quarter.
Chapter Five- The French Quarter
- Walk straight ahead to the well area.
- Look at the wooden sign on the left building and take the CLOCK HANDS.
- Return to the main street.
- Walk to the left to enter the apothecary.
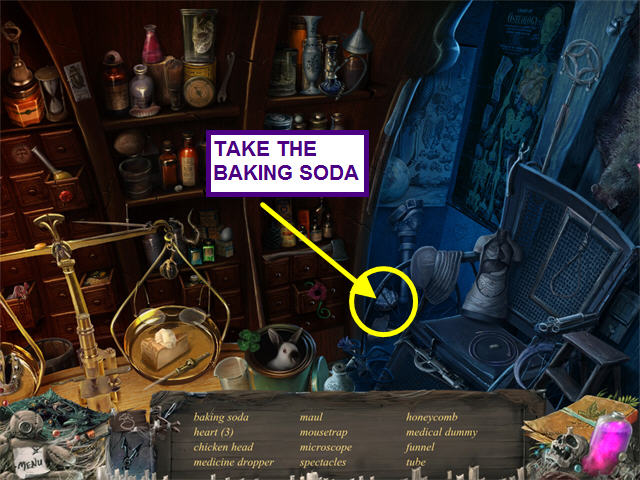
- Select the sparkling area on the the scales for a hidden object area.
- Locate all the items on the hidden object list.
- Collect the inventory item – BAKING SODA.
- The pharmacist will not talk to you until his pharmaceuticals are in order.
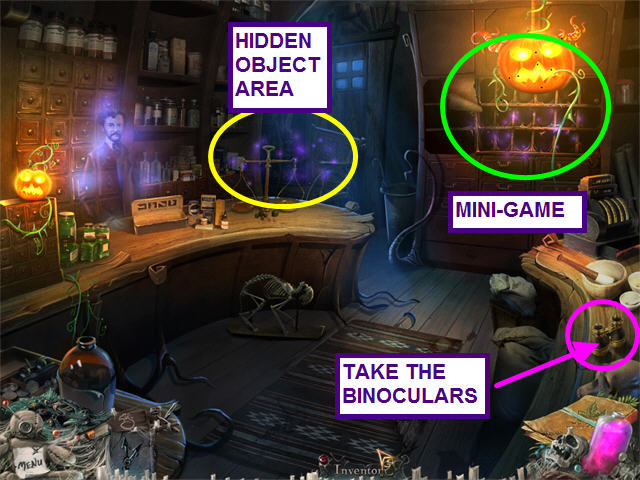
- You can look at the sparkling mini-game on the right, but you are missing a few items.
- Take the BINOCULARS from the right counter and leave the shop.
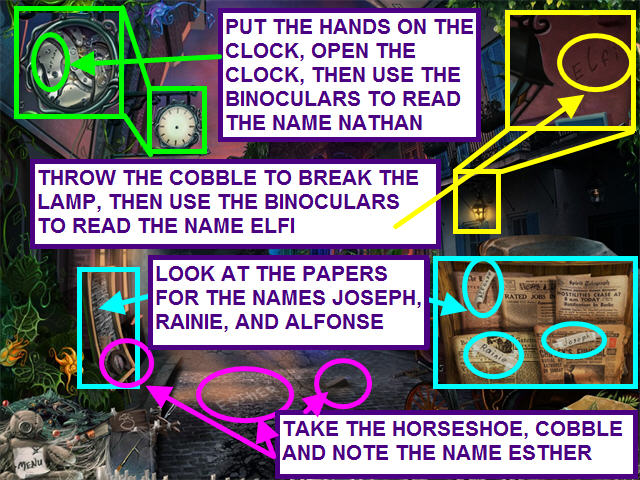
- Take the HORSESHOE and the COBBLE.
- Look at the news sign and note the names: Joseph, Rainie, and Alfonse.
- Make note of the name on the street: Esther.
- Throw the COBBLE at the lamp.
- Use the BINOCULARS on the broken lamp and read the name: Elfi.
- Put the CLICK HANDS on the clock and open the face.
- Use the BINOCULARS on the open clock to read the name: Nathan.
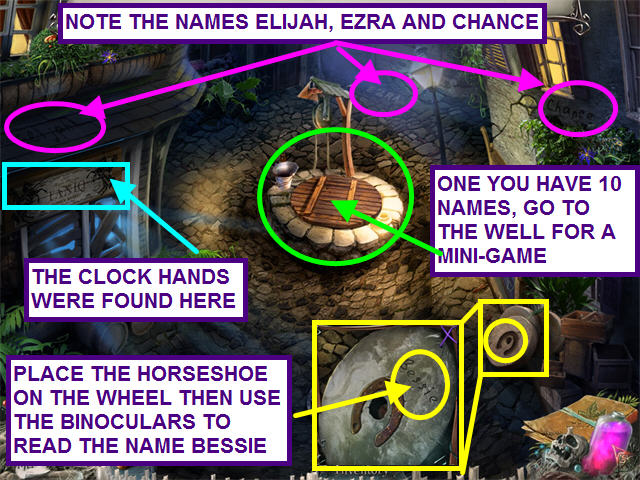
- Walk straight ahead to the well area.
- Look at the name on the left building: Elijah.
- Look at the name on the street behind the well: Ezra.
- Look at the name on the right building: Chance.
- Place the HORSESHOE on the wheel.
- Use the BINOCULARS to take a closer look and see the name: Bessie.
- Now that you have collected 10 names, click on the well for a mini-game.
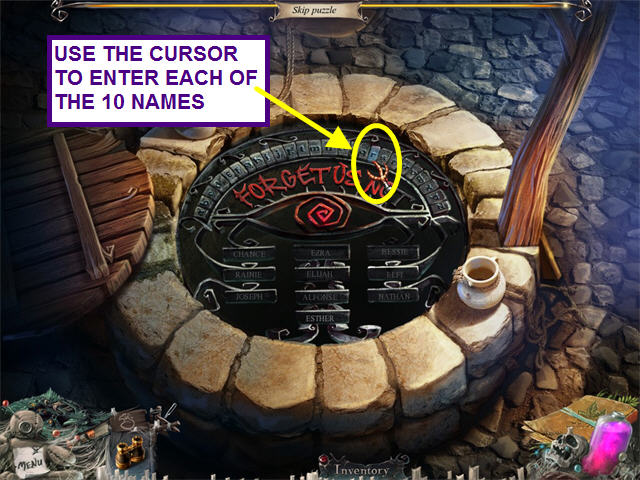
- Using the cursor on the arc of letters, spell out each of the 10 names.
- Once you have entered a correct name, it will stay in place.
- If you make a mistake the slot will clear and you will have to start the name over.
- Once all 10 names are entered, exit the scene.
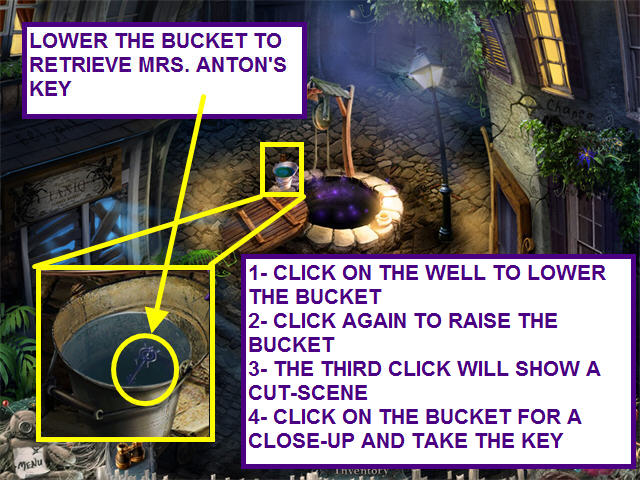
- Now that the spell is broken, the well lid has been removed.
- Click on the well to lower the bucket.
- The second click will raise the bucket.
- Click again to see a cut-scene with Jessie and one of Mrs. Anton's servants.
- Click on the bucket for a close-up and take the MRS. ANTON'S KEY.
- Return to the main street and use MRS. ANTON'S KEY to open the red house on the right.
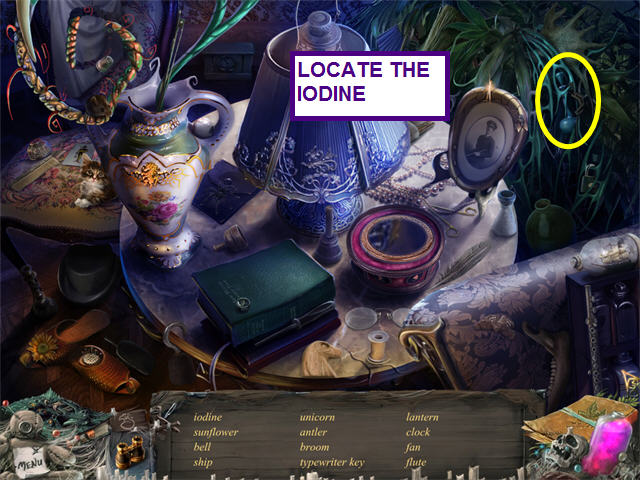
- Select the sparkling area on the table for a hidden object area.
- Locate all the items on the hidden object list.
- Collect the inventory item – IODINE.
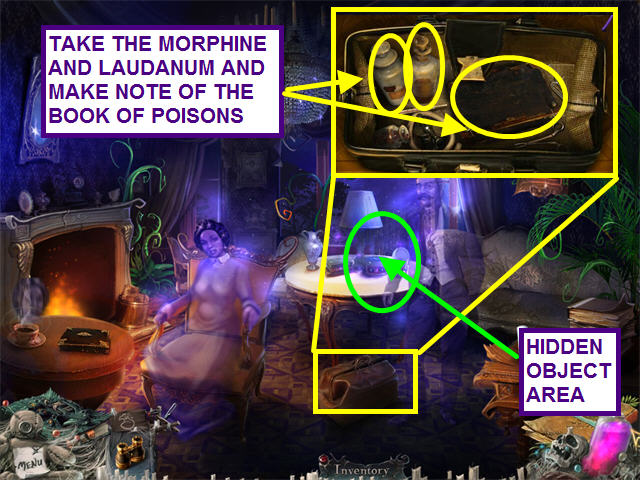
- Look at the close-up of the doctor's bag.
- Take the MORPHINE and the LAUDANUM.
- Make note of the book on poisons and antidotes.
- Mrs. Anton's spirit is too distraught to allow you to look at anything near her.
- Exit and return to the apothecary.
- Click on the sparkling area on the right for a mini-game.
- The object is to put the pharmaceuticals in their proper place.
- Take the MORPHINE, IODINE, and LAUDANUM from your inventory and place them on the empty nooks.
- Read the instruction as to where items must be placed in this logic problem.
- Hint- start with instructions such as “The leeches go in slot 35.â€
- When a item is in the correct slot, it will lock in place.
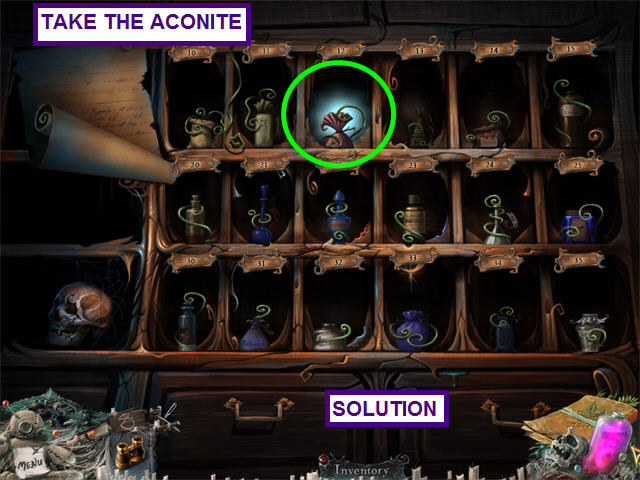
- The top row solution is: quinine, chloral, aconite, willow bark, strychnine, and ethyl ether.
- The second row solution is: laudanum, iodine, alcohol, chloroform, mercury, and ipecac.
- The third row should be: morphine, belladonna, ammonium, aspirin powder, triline, and leeches.
- The pharmacist identifies the poison.
- Take the ACONITE from the top row.
- Exit the mini-game.
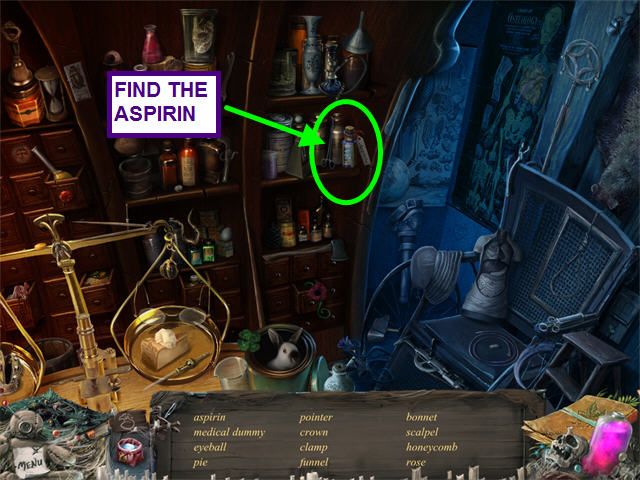
- Select the sparkling area on the table for a hidden object area.
- Locate all the items on the hidden object list.
- Collect the inventory item – ASPIRIN.
- Exit the shop and return to Mrs. Anton's home.
- Look in the doctor's bag at the poisons and antidotes book to get the spell you need.
- Exit to the carriage and return to Jessie's home.
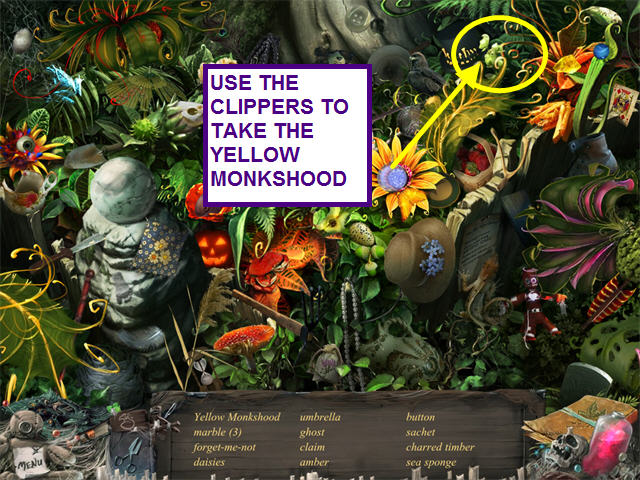
- Select the sparkling area on the table for a hidden object area.
- Locate all the items on the hidden object list.
- Use the CLIPPERS to collect the inventory item – YELLOW MONKSHOOD.
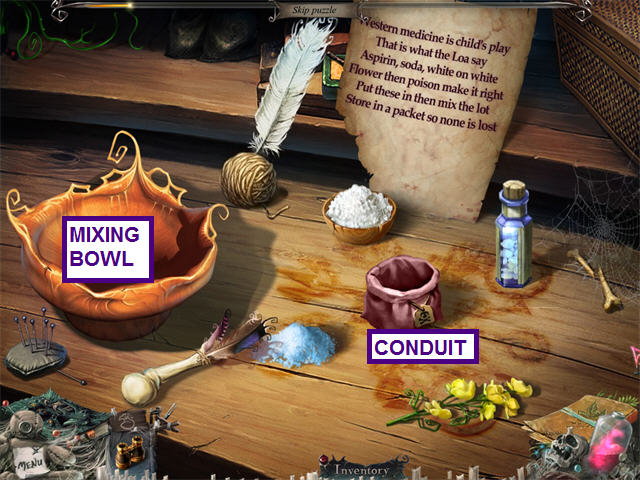
- Enter the workshop and select the spell area.
- Place the ASPIRIN, YELLOW MONKSHOOD, BAKING SODA, and ACONITE in the outer circle.
- Once you place the ACONITE in the outer circle, the packet will return to your inventory.
- Place the EMPTY PACKET into the center of the circle.
- After the instructions appear, place the ingredients in the bowl in this order: ASPIRIN, BAKING SODA, YELLOW MONKSHOOD, and the ACONITE.
- Click hold and drag the stirrer counter-clockwise twice, then clockwise twice.
- Pour the mixture into the packet.
- Take the packet and return to Mrs. Anton's house.
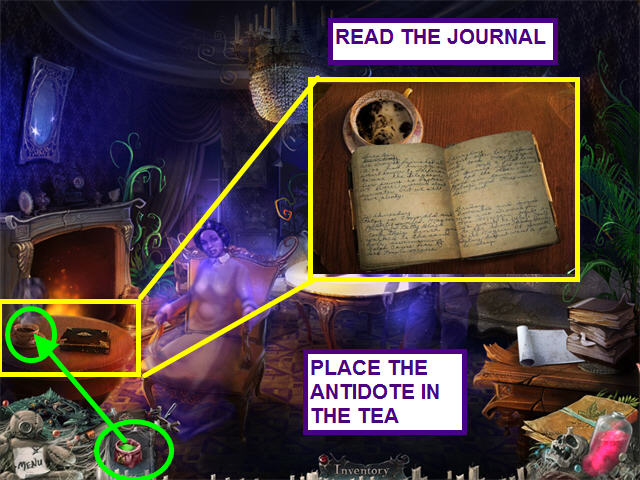
- Use the ACONITE ANTIDOTE on the teacup.
- You can now read Mrs. Anton's journal.
- During the cut-scene, Delphine LaLaurie refuses to pay Jessie.
- She drops her lipstick by the gazebo.
- Exit to the carriage and travel to the cemetery.
Chapter Six – The Cemetery
- Jessie wants revenge on Mrs. LaLaurie and begs you to find the curse.
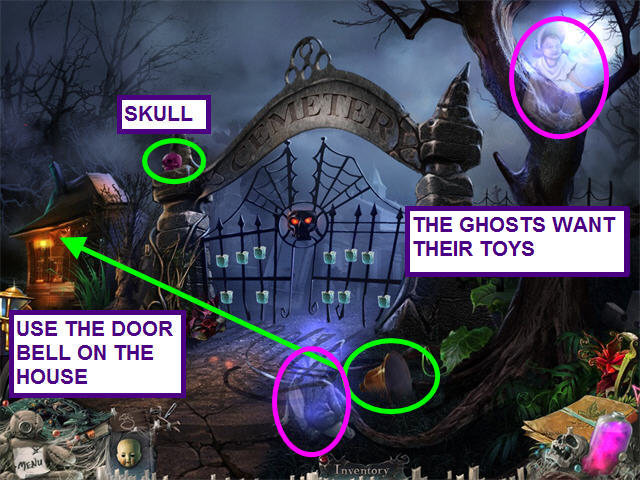
- Click on the boy ghost to learn he had lost his ball.
- The girl ghost want her doll back.
- Take the DOOR BELL and the SKULL.
- Place the DOORBELL on the building and click to ring the bell, then enter.
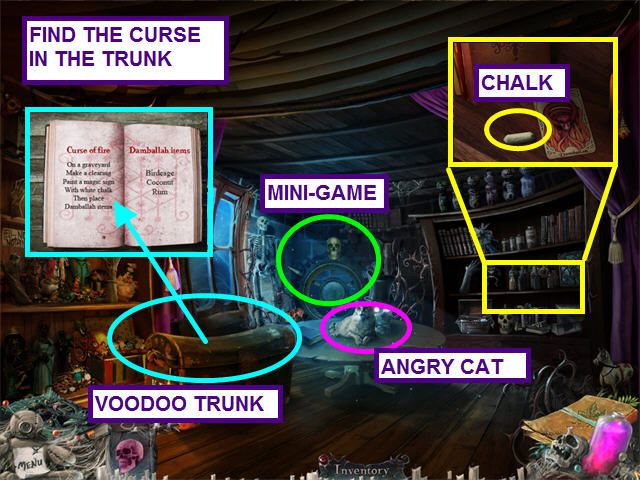
- Look at the large chest and find it reads, “To open the voodoo chest, make the skulls obey.â€
- Note the cat on the table guarding the skull with the hat.
- Look at the right shelves and take the CHALK.
- Use the SKULL on the the other skulls in the rear to open a mini-game.
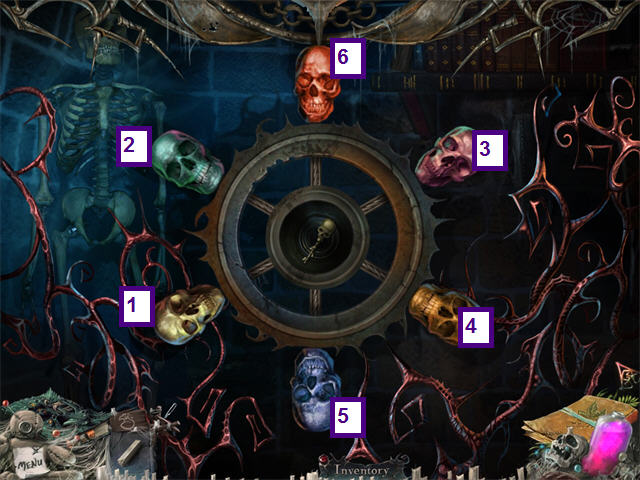
- Per the instructions on the chest, you have to make the skulls obey.
- Each skull speaks a syllable.
- To solve this mini-game, make the skulls say, “ I listen and obey.â€
- Click on the skulls in this order: white- green- red- yellow- blue- orange.
- Take the VOODOO KEY.
- Exit to the room and use the VOODOO KEY on the trunk.
- Look inside and find the curse.
- Exit to the carriage and return to the Cajun swamp.
- Walk left to the wash tub area.
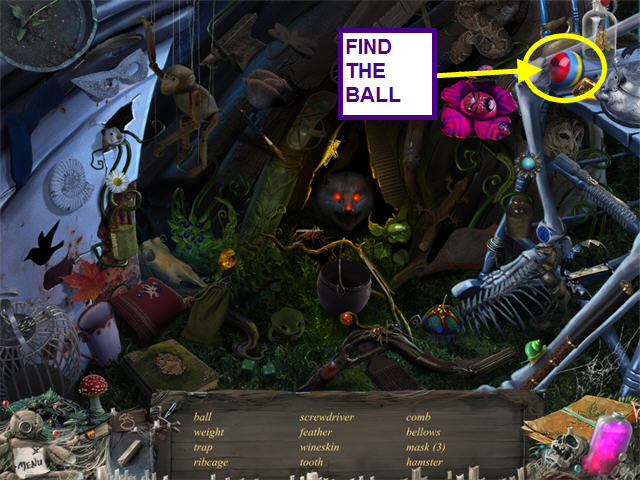
- Select the sparkling area by the skeleton for a hidden object area.
- Locate all the items on the hidden object list.
- Collect the inventory item – BALL.

- Walk up to the boat area.
- Select the sparkling area by the skeleton for a hidden object area.
- Locate all the items on the hidden object list.
- Collect the inventory item – DOLL WITHOUT HEAD.
- It will automatically combine with the DOLL HEAD to make the BABY DOLL.
- Exit to the carriage and return to the cemetery.
- Give the BABY DOLL to the girl ghost and she will give you a gate cube.
- Give the BALL to the boy ghost and he will also give you a gate cube.
- After the boy ghost flies away, take the SLINGSHOT.
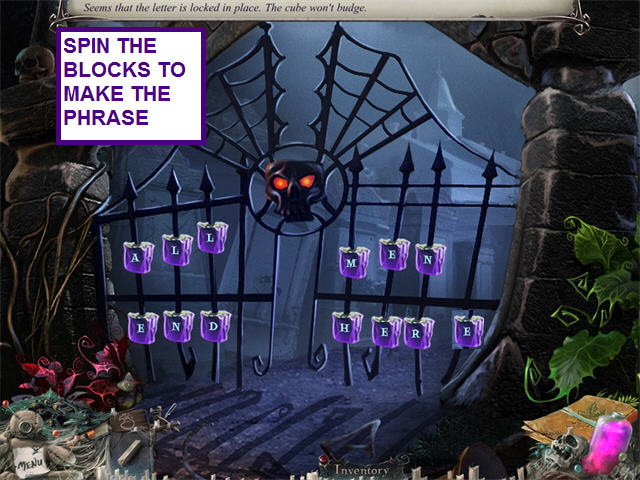
- Use the blocks on the gate to activate a mini-game.
- Spin each block to spell out the phrase, “All men end here.â€
- Each letter will turn purple and lock into place when correct.
- Enter the cemetery.
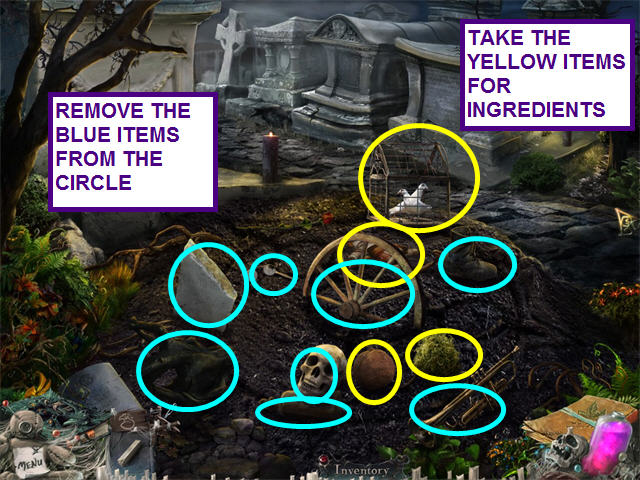
- Take the CAGE, COCONUT, VOODOO DOLL and MOSS.
- Clear the remaining items out of the circle.
- Take the carriage and return to the Cajun swamp.
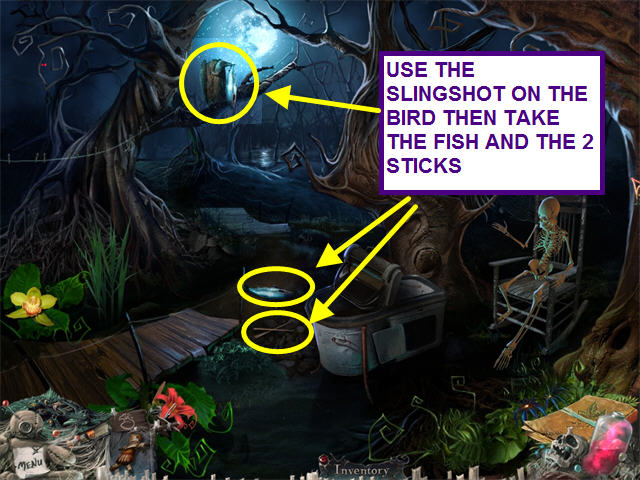
- Walk right to the wash tub scene.
- Use the SLINGSHOT on the Bird with the fish.
- Take the FISH and the TWO STICKS.
- Return to the carriage and travel back to the cemetery.
- Enter the building to the left of the gate
- Give the FISH to the cat.
- Take the hat off the skull then take the BOTTLE OF RUM.
- Exit the building and enter the gate.

- Take the CHALK and trace the lines of the circle.
- Make sure to color the arrows on the outer edge.
- Place the COCONUT, BOTTLE OF RUM, and the CAGE in the circle around the VOODOO DOLL.
- The mean spirits steal the doll so we must make another.
- Exit to the carriage and travel to the French Quarter.
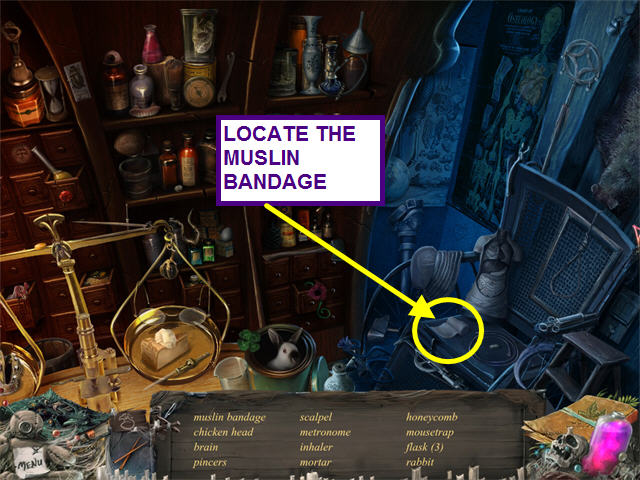
- Enter the apothecary and click on the sparkling hidden object area.
- Locate all the items on the hidden object list.
- Collect the inventory item – MUSLIN BANDAGE.
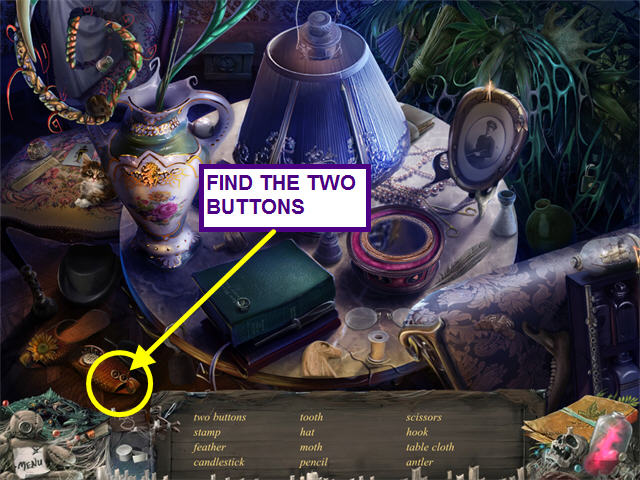
- Go to Mrs. Anton's house and click on the sparkling hidden object area.
- Locate all the items on the hidden object list.
- Collect the inventory item – TWO BUTTONS.
- Exit to the carriage and travel to LaLaurie's place.
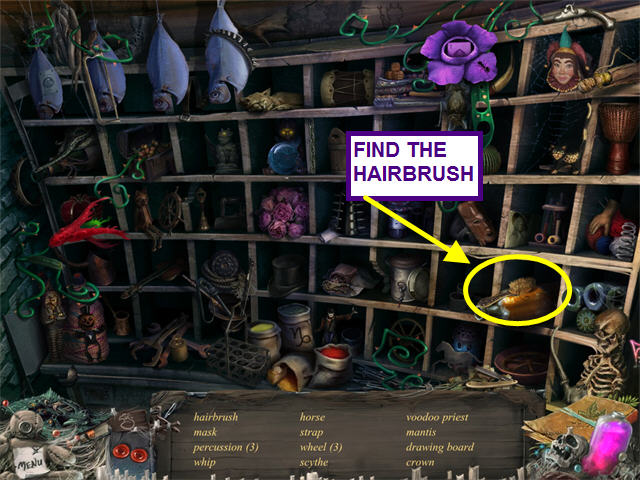
- Enter the cellar and click on the sparkling hidden object area.
- Locate all the items on the hidden object list.
- Collect the inventory item – HAIRBRUSH
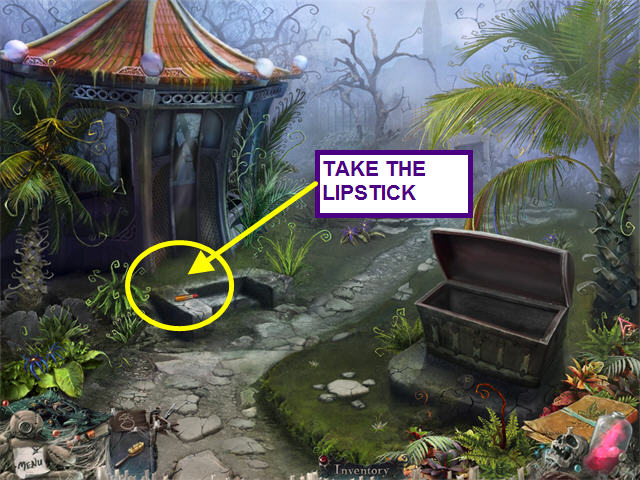
- Walk to the gazebo and take the LIPSTICK.
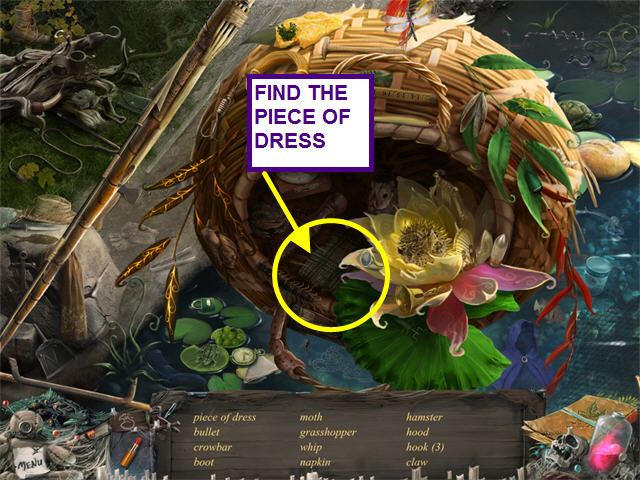
- Walk to the river and click on the sparkling hidden object area.
- Locate all the items on the hidden object list.
- Collect the inventory item – PIECE OF DRESS.
- Exit the the carriage and travel to Jessie's home.
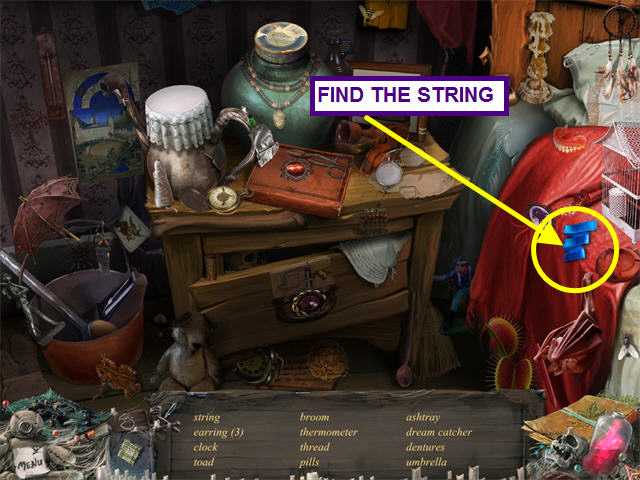
- Walk to the bedroom and click on the sparkling hidden object area.
- Locate all the items on the hidden object list.
- Collect the inventory item – STRING.
- Exit the the house and enter the workshop.

- Click on the sparkling hidden object area.
- Locate all the items on the hidden object list.
- Collect the inventory item – GLUE.
- Select the sparkling spell area.
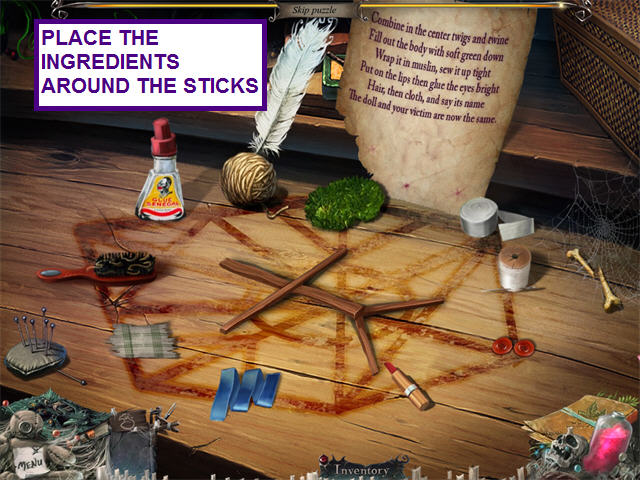
- Place the TWO STICKS in the center of the circle.
- Around the outside of the circle place: SEWING KIT, GLUE, TWINE, HAIRBRUSH, PIECE OF DRESS, TWO BUTTONS, LIP STICK, MOSS, and MUSLIM BANDAGE.
- Once the instructions appear, use the TWINE to tie the sticks together then add the moss.
- Next use the MUSLIM BANDAGE then the SEWING KIT.
- Use the LIPSTICK for the mouth.
- Use the GLUE and the TWO BUTTON to make the eyes.
- Place the HAIRBRUSH on the head to give it hair, the add the PIECE OF DRESS.
- Exit to the carriage and return to the cemetery.
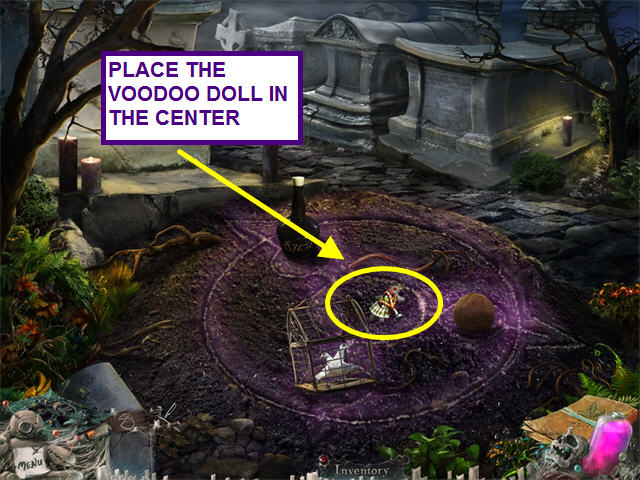
- Enter the gate and place the VOODOO DOLL in the center of the circle.
- Jessie finally gets her revenge.
Congratulations! You have completed Deadtime Stories!